Brief Introduction to MacOS Forensics
Last week I was responsible for a very small part of a larger investigation, where I was able to forensically analyse a Macintosh laptop (running MacOS High Sierra, APFS). As this was my first time doing this sort of thing, I wanted to share some common places where you could potentially find interesting artefacts, and some tips on using X-Ways as part of an investigation.
User Documents:
If you already have a lead or you’re looking for something suspicious that might have occurred, I would recommend running a search through the below directories by doing a ‘Simultaneous Search’ in X-Ways (or any similar functionality if you’re using a different tool). This way, you can quickly identify any artefacts that may be relevant to your case.
\Users\<username>\
- Applications
- Caches; includes important service and application metadata, logs, and cache databases.
- Desktop
- Documents
- Downloads
- Library; a key directory that stores metadata, launch agents, cookies, application data, and much more.
- .Trash
- .bash_history & .bash_sessions
Application Logs:
\Users\<username>\Library\Application Support\
- <application name>; this stores configuration, logs, and preference files for an application that has been installed onto the machine.
- CrashReporter; this is the directory where crash logs are stored, and keeps track of when an application has crashed and why (although, sometimes, the errors are quite generic — who’s surprised?).
A quick note: CrashReporter logs (and many other artefacts) are most likely going to have the extension .plist, which are also known as property lists. Sometimes they are binary files, so a neat way to view these on a Mac is to select the file and hit the spacebar. As you’ll see below, Apple’s Quick Look framework presents you with the contents of the file, which shows that the last time Skype for Business crashed was the 23rd November 2018.

\Users\<username>\Library\Launch Agents\
Applications listed in this directory are launched each time the computer boots, similar to Startup applications on a Windows machine.
User Browser Logs:
\Users\<username>\Library\Safari\
- History.db; this can be viewed with the free version of “DB Browser for SQLite”, as shown below. The main table you want to look at here is history_items, which the URLs viewed within this browser, and how many times it was visited. ‘History_visits’ only shows the title of the webpage, and the time it was accessed.

\Users\<username>\Caches\Metadata\Safari\
- History; this directory is full of .webhistory and .bplist files, of which I use the ‘cat’ command to view their contents; you might find some URLs here that could be useful in an investigation.
- Bookmarks; much the same as History, however these are .webbookmark files.
\Users\<username>\Library\Application Support\Firefox\Profiles
- places.sqlite; this is a database file that can be viewed with DB Browser. Tables of interest include -
‘moz_bookmarks’ will show the sites bookmarked by the user
‘moz_items_annos’ are annotations for bookmarked items
‘moz_places’ are the list of viewed URLs from the Firefox browser.
\Users\<username>\Library\Application Support\Google\Chrome\Default
- History.sqlite tables of interest include -
‘downloads’ will obviously list downloads with filename and URL
‘keyword_search_items’ for keyword terms typed into the browser
‘urls’ is the user’s browser history with the url and title of the site visited
‘visits’ also shows you the number of times the user visited a particular URL, and how long for (visit_duration).
\Users\<username>\Library\Internet Plug-Ins
Provides a list of plugins that have been added to the browser.
For Firefox, extensions are stored in \User\<username>\Library\Application Support\Firefox\Profiles\*\extensions.json.
For Chrome, it’s in \User\<username>Library\Application Support\Google\Chrome\Extensions.
System Logs:
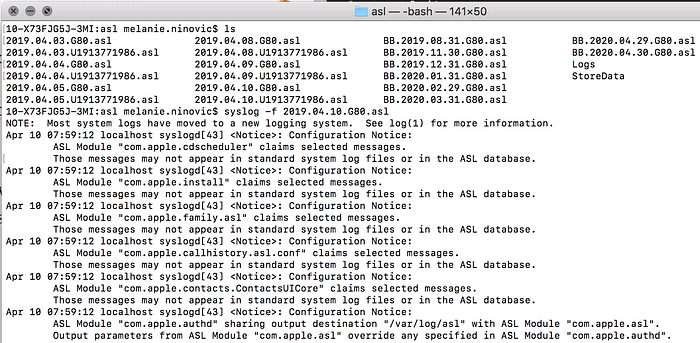
\private\var\log\asl
These are Apple System Logs, and are generally thought of as a replacement to syslog. You can view these files by running syslog -f log.asl, as shown below.
\private\var\log\install.log
This log contains a list of applications that have been installed onto the machine.
For networking:
Library\Preferences\SystemConfiguration
- com.apple.airport.preferences.plist contains all of the remembered wireless networks for the machine
- NetworkInterfaces.plist.
Demystifying a very small subset of X-Ways functionality:
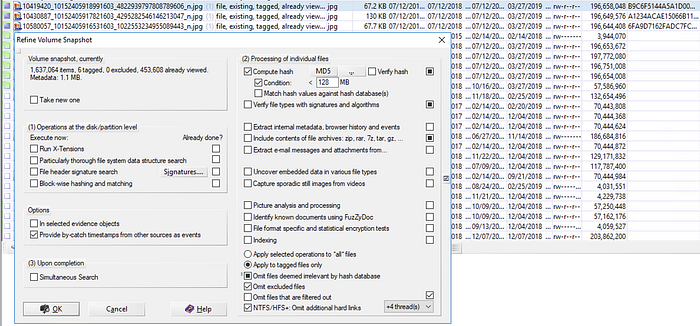
To finish off this post, I quickly wanted to go through some lessons learned from using X-Ways for the first time in an engagement. Firstly, computing MD5’s (or other hash functions) isn’t as intuitive as it should be. X-Ways has a local capability (for one particular file or directory) and a global one. The image below shows the global method of computing hashes.
You can see that I’ve tagged three image files. By going to Specialist -> Refine Volume Snapshot, you can see at the bottom right that you can “Apply to tagged files only” and “Omit excluded files”. Before clicking OK, I made sure that these three image files were the only tagged files, otherwise it would go ahead and compute the hash for each tagged file.
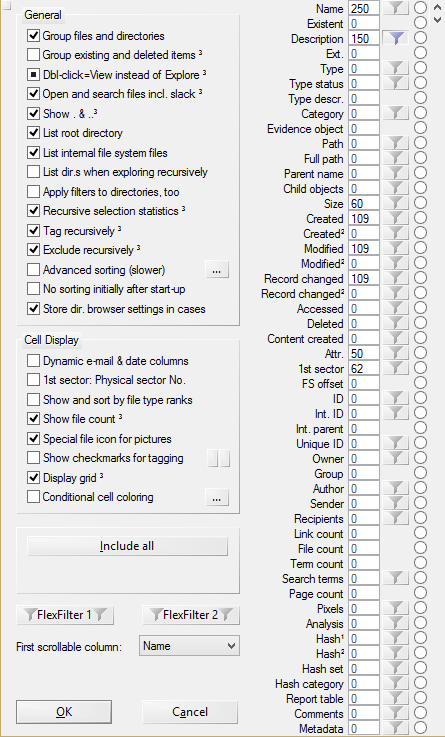
The second aspect has a bit of a strange story to it. An analyst asked me to include the “Accessed” timestamp for the artefacts I had found, and my honest thought was “what? I didn’t think Mac’s contain that timestamp”, as I’ve only been seeing Created, Modified, and Changed for the past couple of days. Well. They do. It’s just that X-Ways unfortunately does not show the Accessed Timestamp column by default. Here’s how you can include these timestamps, and other very meaningful columns to a case.
To get to the below screen, go to Options -> Directory Browser. You can see that the “Accessed” entry has a zero value. I ended up just entering a random non-zero value, clicked OK, and the Accessed column appeared. However I found out that if you click on the word “Accessed” in this view below, X-Ways will fill the value with it’s own number.
Lastly, I want to touch on X-Ways’ search functionality. For a short while, I’d be getting heaps of results back, without knowing where to find the actual file that referenced my search term/s. Behold the wonderful navigation option that I forgot about for a couple of hours. By right clicking on an item name within the search pane, go to “Navigation -> See selected item in its directory”, which will take you straight to the file’s directory.
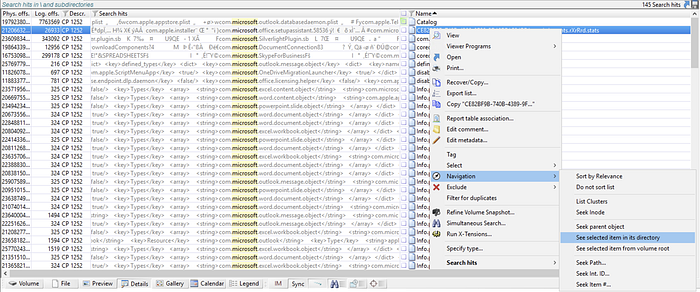
To revisit the search pane, click the magnifying glasses at the bottom of the screen. You can also individually select search term hits to the left of the bottom view.

Yes this was brief, but I do hope it’s helped someone along their MacOS journey as it’s helped me write it.